For all of the hockey parents or young players out there who might be starting out with the great game of hockey, there are certain fundamentals that you will want to learn as you prepare for your games and practices. One of the procedures you’ll want to learn is how to tape a hockey stick.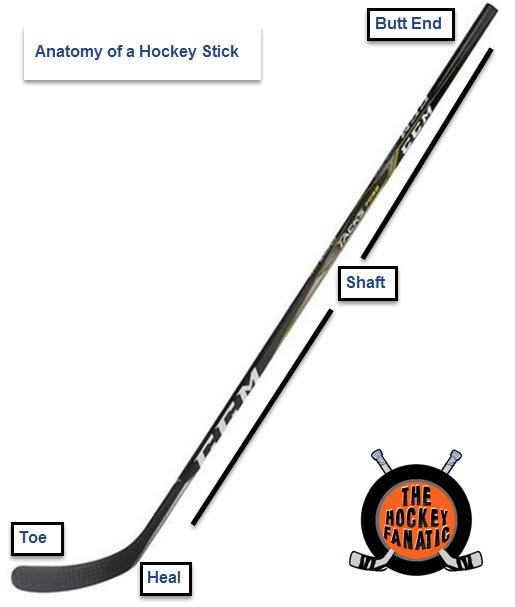
There are different methods for taping the stick and as hockey players get older they tend to develop their own methods for taping their sticks. There is no right or wrong way to tape a hockey stick. It becomes a matter of preference. For children in minor hockey it comes down to what feels more comfortable for them when the stick is in their hands.
Taping your stick typically involves:
- Taping the blade
- Taping the grip (butt end) of your stick
There are benefits of taping each.
Benefits of taping the blade
- Better for puck handling/increased puck control
- Protection of the blade
- Prevent Moisture on your blade
Benefits of taping the butt end of the stick
- Better grip
Hockey tape is a special type of tape that is a “friction tape” which is a blend of cotton fabric with a rubber glue-like adhesive to make it “sticky”.
How to tape the blade of your hockey stick
When taping the blade of your stick you have two options.
- Taping from toe-to-heal
- Taping from heal-to-toe
Regardless if you tape your blade from heal to toe or toe to heal, the process is the same. One of the most important things to remember is consistency in the spacing of the tape.
- Pick a starting point
- Starting at either the toe or heal of the blade, overlap the tape slowly and consistently, overlapping by half each wrap.
- Continue until you reach the end of the blade or base of the shaft.
- Rip or cut the tape at the top of the blade (the top is recommended as you don’t want it unraveling as the tape gets wet from the ice.
- Using scissors cut the tape at the end of the blade ensuring a clean, smooth tape job around the edge of the toe. Cut around the curvature of the toe for the cleanest look.
- Pat down the tape – using either a puck or the end of your tape (preferred), smooth over the blade tape to make the tape adhere tighter to the blade. Run the tape or puck over the seams not against the seams to make the tape tighter on the blade. Complete this for the face, bottom and back of the blade. Rub it along the tape area, in the heel to toe direction.
If you like, you can apply a thin layer of the stick wax to the blade area which you have just taped and the bottom of the blade. This can protect the tape (and blade) from moisture from the water and ice.
A slight variation for taping the blade has become popular with professional players and is actually my preferred method of taping the blade of my sticks. This is the where you simply leave the toe of your blade without any tape. Benefits of this type of tape job include:
- Great for toe drags – the open toe method of taping your stick is great for handling the puck, specifically with toe drags.
- Quicker release – the open toe method is great for getting off a quick release as the puck will slide better to the middle of your blade for a quick snap shot off of the blade.
- Improve shooting accuracy – with practice, you can use to open toe taping method to better judge how the puck moves against your blade and thereby focus your shots with better accuracy.
Open Toe Blade Taping Method
Image courtesy of https://www.hockeystickman.com/
How to tape the knob handle of your hockey stick
Starting at the top of your stick, you want to create a knob so your hand doesn’t slide off.
- Begin at the top of your stick, wind the hockey tape around the top of your stick.
- Wind the hockey tape about four to six inches down the shaft, overlapping the tape roughly halfway each time.
- Begin at the top of your stick, wind the hockey tape around the top of your stick.
- Continue to wind around the top of your stick until a “knob” forms. Anywhere from six to 10+ wraps.
- Wind the hockey tape about four to six inches down the shaft, overlapping the tape roughly halfway each time.

Want to create finger grips? This can be accomplished by what is referred to as adding a candy cane of rolled tape around the grip area of the top of your stick. To create a finger grip (aka candy cane taping):
- Hold or fasten one end of the tape.
- Pull a long strand. We recommend 12-18 inches
- Spin the tape roll until you have a nice, tight length of tape
- Place the rolled tape around the butt end of the shaft. You can space it as close or as far apart as desired. As a general rule of thumb consider spacing it the width of a hockey glove finger.
- Using either grip tape or just regular hockey tape, start at the top of the butt end and tape over the finger grip tape that you just added. This will cover the ribs of tape and provide more grip. It should look something like this:

Taping a Hockey Stick FAQs
How often should I tape my blade?
This depends. Some players like to tape the blades of their stick before every game. While others might wait to re-tape it until after a few games. For children, evaluate how the tape looks after a couple of games, if it is chewed up, you might want to consider removing the existing tape and re-taping the blade.
What kind of tape should I use?
You can use normal stick tape (aka hockey tape) that you can find at most sports stores. Most hockey tape is friction tape which is more adhesive. Do not use clear plastic tape, electrician’s tape or duct tape.
Is there a difference between black and white stick tape?
No, other than color.
Is it true that black tape conceals the puck better making it harder for goalies to see?
This is an interesting myth but most goalies you talk to say that it does not make a difference to goalies. Again it comes down to personal preference. Here’s a fun article from NHL.com on the topic of black or white tape.
Should I remove the old tape before re-taping the blade of my hockey stick?
Yes. Taping over top of the existing tape will cause the blade to be heavier and will be a detriment to your shooting and passing. Remove all previous tape and tape fresh each time you need to tape your blade.
Resources
https://www.canadiantire.ca/en/howto/project.html/project/sports-and-rec/tape-your-hockey-stick.html
http://blog.hockeyplayersclub.com/the-ultimate-guide-to-how-to-tape-a-hockey-stick/